Sunday, September 27, 2015

Winner, Winner! Sorry, no dinner, just a winner.....

I had such a great time with all of you who joined in the Chouxchoux Paper Art Halloween hop and I am so thankful for your visits and words of encouragement!!  A HUGE thank you to Lori for hosting such a terrific party and WOW, what an amazing group of talented crafters. I had a BLAST!

I wish I could give you ALL a prize, but since I am randomly selecting only one person from all the comments, my grandmother and I decided to decorate up a tree up to say thank you for all the Halloween cheer you've given me!
Black cheesecloth mesh, burlap, ravens, bats, pumpkins, stars, owls, ghosts, skulls, raffia ribbons, sentiments, and  filler berries and twigs.  Items were either purchased at the Dollar Store or handmade at home.  In all I think we spent a total of $10.   There's even a paper rat that we cut out on the cameo climbing up the bottom of the tree.
And now... who will receive the prize???
Can we dim the lights and have a drum roll, please?
Thank you...
The winner of my giveaway is....
Comment #67 with:
"Oh my goodness, too, too funny! It makes me laugh all over myself! Great creativity!"

Congratulations Tammy!! 
You've won a $25 gift certificate to go shopping at The Funkie Junkie Boutique.
Please email here to receive your gift certificate.
Big hugs and Happy Crafting everyone!
Lisa xx

Thursday, September 24, 2015

Tree Topper Trick or Treater???....

Hello, hello, hello...
Just a little post to show today because so I'm excited that House-Mouse & Friends is hosting a DT call and I (for sentimental reasons) thought I needed to give it a try.  
Every Christmas for the past, I can't even remember now, my Mom has purchased a House-Mouse stamp and put it in my stocking for Christmas morning.  I remember when I was little and couldn't wait to find the toy or candy, but now I get all giddy waiting to see what that year's stamp will be!!
So, when I went to grab a stamp and make a card, it being the beginning of Fall here, I thought I'd do a Halloween card, BUT....since I always got Christmas stamps, I was stumped.  Never fear, little Muzzy the Mice Star (tree topper) doubled as a trick or treater in his yellow star costume. I then added a little pumpkin basket for him to carry.  
Since the stamp was originally a Christmas stamp, I decided that the card should be a snow globe shaker card with a Halloween scenery.  I've used the wonderful Christmas Shape Shaker Cards located at The Cutting Cafe shop.
And here it is all finished up!
My grandma is here visiting us and as soon as I finished making this she grabbed it and put it in her suitcase. I'm gonna take that to mean that this card no longer resides here...  ;)
The theme for this current challenge, HMFMC203, is either 'Anything Goes' or "BINGO'.
I opted to do across with Ribbon, Yellow, Flowers/Leaves.
This challenge still has 2 days to enter so you should REALLY, REALLY, REALLY try out too!!
I'd also like to enter in the following challenge:
Gruffies & Guests- Challenge 21; Make it Fruity or Anything Goes 

Thank you so very much for your visit.
Biggest of hugs and Happy Crafting to you.

I'll be back on the 27th to announce the winner of my surprise prize for the 
Chouxchoux Paper Art Halloween Party, so stay tuned!

Tuesday, September 22, 2015

DIY Recycled Jeans Halloween Centerpiece....

I'm so sad! It's the final day of our Chouxchoux Paper Art, Halloween Party.  I've had such a blast crafting alongside all these talented people and visiting you all.  But...there's still more fun to be had. There's plenty of time to enter your current Halloween or Fall projects into the Challenge and there's still prizes to be won!  Okay, on with show...

I'm going to show you how to drop your pants and make a centerpiece!! 
Well, okay, you don't exactly HAVE to use the ones you're wearing, but if you have an old pair saved, I found a fun way to use them!

RECYCLED JEAN WITCH HAT CENTERPIECE
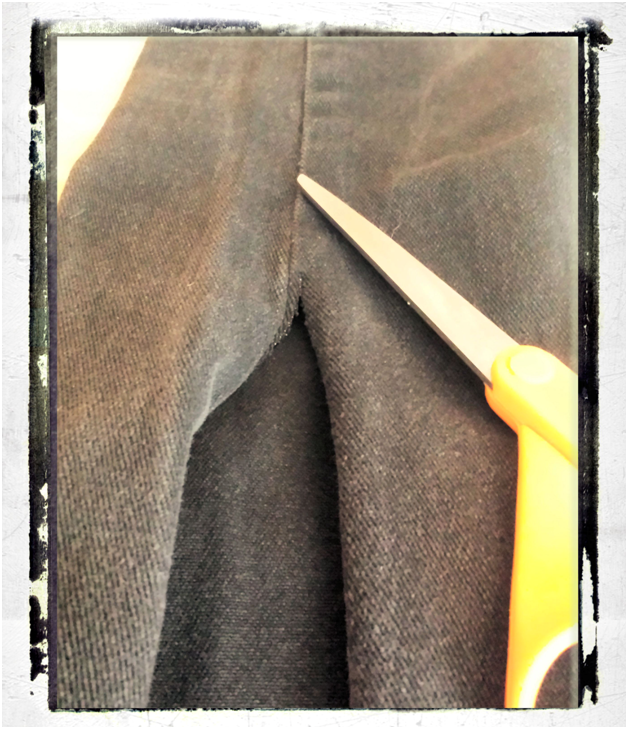
Step 1:  Cut both legs off your jeans.  
Step 2:  Take one leg and cut it the length you would like the top of the hat. Make sure to cut at an angle so you have more of a 'pointy hat tip' when you sew it up.
Step 3:  Turn this piece of jean inside out and sew along the top to create your witches pointed hat.
Then turn it outside in again.
Step 4: Now that you've sewn the top of this leg to create the top of the hat, take your scissors and cut off the hem at the bottom and set that aside. You'll use it later too.  
Step 5:  Now cut 'slits' in the bottom off the jean, like you see below.  Set this aside for now.
Step 6: You'll need a piece of foam board (Walmart and Dollar Tree have them) or a sturdy cardboard will work too.  Trace a circle with a dinner plate and then a smaller circle inside of that to create the base of the witch hat as you see below.
Step 7:  Now it's time to take your jean leg aka top witch hat and insert it into the hole of your base and hot glue the slats in place on the bottom side (as seen below).
Step 8:  Now you get the other leg and this will be what you use to cover the base of the hat.  Be sure to cut off the hem of this one too and set aside for later. 
Step 9:  Now cut this leg right up the seam until it's open completely.
Step 10:  Begin gluing (I used a hot glue gun).  It doesn't need to look pretty or perfect as it will be covered with stuff, plus we're going for a 'well worn' look!
Step 11:  I placed a large plastic cup inside the hat so that I could have some stability while I slathered the hat in Stiffy Stuff (Found at Walmart). 
Once you've applied the fabric stiffener and blown or air dried, you can begin to shape and bend the hat to your desired look.  At some point where you feel the hat is holding its shape well, you can remove the cup inside and replace with Poly-Fil Fiber also.
Step 12:  Now for the REALLY fun part. You get to paint and decorate.
On the left you'll see some of the colors I've added to it to age it, but the choice is completely up to you. I also added some crackle in places where I wanted the hat really worn looking.
 
Step 13:  Grab all that hem that you cut off earlier and while the paint is drying, you can go ahead and glue that hem to the rim of the hat.
Step 14:  Decorate!!!! 
Most of my decorating supplies were purchased at the Dollar Store or handmade at home.  I think I invested a whole $7 dollars to embellish this.  A few other decorations that I used came from my collection I already had from The Funkie Junkie Boutique
I added foil tape to cardstock and then painted the tape to look like rusty metal.
Here I've taken an orange plastic pumpkin and mod podged the Sunday comics over it.
And now it's finished....
So that's hat that!!
I'm so happy you could join me for the final day of the Halloween Party and I hope you've found something inspiring to help you for the holiday.
Big hugs and Happy Recycling to you,
Lisa xx

Here's the fun news:
Our gorgeous hostess, Lori Hairston, from Chouxchoux Paper Art will put names "in the hat" for every comment made.  So if you'd like to be eligible to win a prize or giveaway, leave a comment on each blog each day (individual blogs may have giveaways too, you never know...so don't miss out!) to get the most chances to win!!
                  Winners will be announced on September 27th!S

Also, there's MORE FUN!!
We have an open challenge for ALL to enter.  All you have to do is submit a current Halloween or Fall card or project, post about it, and link it up to Chouxchoux Paper Arts Challenge #1 where you'll find the link button!  All entries must be submitted by October 3rd and the winner will be randomly selected and announced on October 4th at Chouxchoux Paper Arts.
Winner receives a $25.00 Gift Certificate from the very generous Lawn Fawn!

LASTLY, I'll be giving away a surprise here on my blog, so if you like something you see on my posts, please leave me a comment and you're eligible to win. I'll announce the winner on the 27th of September as well, here on my blog!  Best of luck to you!!

 Blog List For today
                      Lisa Minckler (you are here)

and a HUGE thank you to our FABULOUS prize sponsors as well:
   The Funkie Junkie   $25 gift certificate
                The Cutting Café three free files of your choice
                 Lawn Fawn   pillow box and  peek-a-bat dies
Shopping
Thank you so much for stopping in!
Happy Happy Halloween and good luck to you on winning a prize!!


Monday, September 21, 2015

Outhouse Halloween Humor....

Oh boy, oh boy, oh boy....are we having fun now!
Firstly, Thank You SO much for all the very sweet comments that were left yesterday for the DIY Candy Corn Figures.  I'm so glad you enjoyed them. Your comments were so thoughtful.
Welcome again to the second day of the Halloween party hosted by the lovely Lori at Chouxchoux Paper Art. Today I'm going to show you what I did to make a funny Halloween Outhouse centerpiece.
I found all of these files at the Silhouette Design Store, but I know there are several file shops out there that you can use. I've also linked the supplies I used, to the shop I bought them at, The Funkie Junkie Boutique; which is also one of our very generous sponsors. Okay, so here's how they started out.

Next step was to paint and crackle and stain the outhouse before assembly.
The tree was done exactly the same....
Extra bit and bobs were added to complete the scenery.
A closer look at the black powder embossed street light and the folder embossed aluminum foil tape that I used to make the outhouse roof. I used a spiderweb folder and then Adirondack inked the tape.
Beware of ghosts that lurk in the trees!
And bats that swarm 'by the light of the silvery moon!'
And the horrors that befall you when you're a Mummy and the outhouse is out of paper!
And one last time all together....
There you have it, a little idea for a centerpiece on an entry table or your desk at work or even in the restroom!  You're never too old for potty humor!

Here's the fun news:
Our gorgeous hostess, Lori Hairston, from Chouxchoux Paper Art will put names "in the hat" for every comment made.  So if you'd like to be eligible to win a prize or giveaway, leave a comment on each blog each day (individual blogs may have giveaways too, you never know...so don't miss out!) to get the most chances to win!!
                  Winners will be announced on September 27th!

Also, there's MORE FUN!!
We have an open challenge for ALL to enter.  All you have to do is submit a current Halloween or Fall card or project, post about it, and link it up to Chouxchoux Paper Arts Challenge #1 where you'll find the link button!  All entries must be submitted by October 3rd and the winner will be randomly selected and announced on October 4th at Chouxchoux Paper Arts.
Winner receives a $25.00 Gift Certificate from the very generous Lawn Fawn!

LASTLY, I'll be giving away a surprise gift here on my blog, so leave me a comment on my posts and I'll draw from the names.   I'll announce the winner on the 27th of September as well, here on my blog!  Best of luck to you!!

Lots of ways to win, so don't miss out
Blog List For today
                      Lisa Minckler (you are here)

and a HUGE thank you to our FABULOUS prize sponsors as well:
   The Funkie Junkie   $25 gift certificate
                The Cutting Café three free files of your choice
                 Lawn Fawn   pillow box and  peek-a-bat dies
Shopping
Please visit us again tomorrow for the final day of our Halloween Party hosted by
Hugs and Happy Crafting,
Lisa x