Showing posts with label Recycled Products. Show all posts

Tuesday, April 21, 2015

Friendship or Chocolate? Yes please.....

"There is nothing better than a friend, unless it is a friend with chocolate."
-Charles Dickens
Well, today I have recycled/upcycled project to share that sports a quote from Charles Dickens. I rather like the prior that mentions chocolate, but unfortunately the chocolate didn't make it long enough to be photographed. So, here is what I have to share today for a few mixed media challenges.
Found this at a thrift store for a couple pennies and wondered if it wouldn't make a cute water pitcher. I actually wondered that months ago as it collected dust in a cabinet.  As fate would have it, an April rolled around and a flourish of perfect challenges presented themselves and I thought this little 'oil' dispenser could use a new life.
Gathering the traditional mixed media products I began disguising and reinventing...
Wait! What's that? 
Well, it's an experiment. You be the judge if you like my watering pitcher actually pouring water (of sorts) along with its flora.
Above you can see the finalized stream of 'water' and later you see that the water has produced the foundation for these handmade flowers.
Another mixed media technique is stenciling and also a requirement for several challenges, so this Gothic stencil with modeling paste was applied to the front of the pitcher.
Another criteria for one of the challenges was to only use (1) stencil, (1) stamp, and (1) color...I chose to do an ombre of pinks. 
I used a stamp from Stampin' Up that has this Charles Dickens quote.
And here is is again showing that the liquid (hot glue) stream can be removed if desired.
Thank you so much for your visit and I hope you found some inspiration in this project.
Hugs and happy creating, 
Lisa x
I'm off to go rummage up some more chocolate!

Challenges I would love to enter:
Mixed Media Mojo - Recycle/Upcycle: Twist: Flowers
Mixed Media Place - The Power of One (stencil, stamp and color)
The Artistic Stamper - Flora and Fauna
Stamps and Stencils - Anything Goes

Monday, March 23, 2015

I Love Me Some M&M's.....

Hello! Hello! Hello!
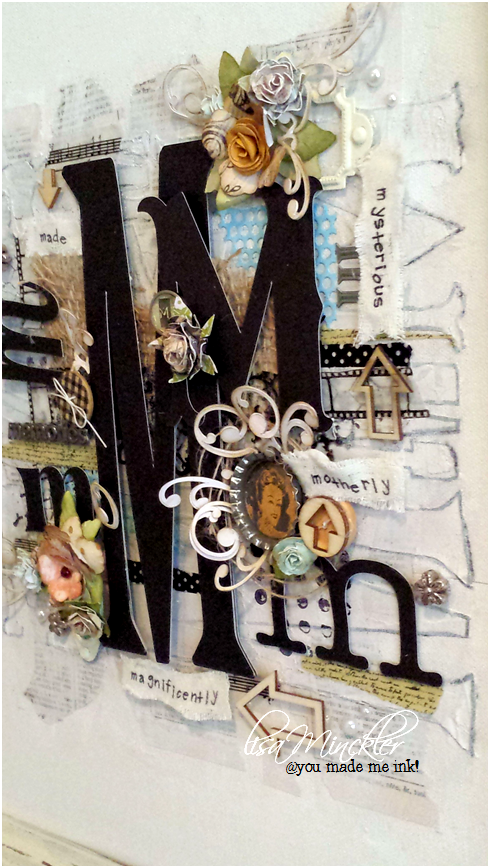
I wanted to try making something for the current challenge @ Mixed Media Place where the theme is Typography.
We had this frame laying around that needed to be recycled and so I set about creating a faux canvas for the base using cardboard, brown paper wrap for backing and adhesive printable canvas sheets.
Here it is ready to start...
Since the theme is Typography, I used my silhouette machine to cut out a collage of M's. I would use the negative as a stencil and the positive as standouts to decorate.  I also tore out pages in the dictionary under the letter M.
Applying the dictionary pages with Mod Podge in a torn random pattern.
Then came the modeling paste.
Once dried, I outlined each pasted M with a distress ink marker to individualize them. 
When that dried, a light coating of watered down gesso was then painted over the top of  it all.
Instead of using cardstock for 'wordy' labels, I decided to stamp onto this material that I found in a flea market.
Handmade flowers, flourishes, and assorted frames and M's of various textures and types, along with "M" words for the wall hanging.
Some stamping, washi tape, wooden arrows and a little fraying....
Bottle cap mom, buttons and more arrows.
flowers and bling and more distress inking.
And there you have it!
Thank you so much for your visit.
Hope you enjoyed this and can join along in their challenge. The DT samples are mind blowing!
Hugs and Happy Crafting,
Lisa x

Monday, March 9, 2015

I'll Do It For Bacon.....

Hi there and welcome back!
When I ran across this little silver piggy bank for one dollar, I couldn't quite refuse. I figured he'd come in handy for something.  Little did I know he'd become a motivational speaker!
I lathered this little hog up in gesso and got to work covering him with sheet music.
Random and various shape stamps (hexagon, dots and splatters) were covered in Versamark, then stamped to his 'hide' and covered in clear embossing powder. 
Now that I think of it, it makes him look like he's working up a sweat flying...and reasonably so!
Then Old Paper DI was applied for aging.  
After I finished making the bifocals for his face, I realized the uncanny similarity between my bit o' flying bacon and this guy from Banshee. 
Here are the stamped wings that I made and then overlaid another sentiment stamp in white.
"Spread your wings and fly"
Perfect sentiment for a pig on the go...
This is one of the TH Custom Fasteners or 'brads' that I used as a button for his bowtie and those are his washi tape covered hooves.
Because that is a lucky number in our home....
Trying out the new remnant rubs that were travel and ticket related 
as he's obviously 'in flight'.
And now, I have no excuse to delay anything I was avoiding or putting aside for another day, because... 
he flew!
Oops....I almost forgot. At the last minute I realized his face was still kind of bland so I cut a piece of  cardstock and made him some black bangs. LOL!
This will sit in my studio and keep me inspired and motivated.
I hope you like him too.
This little buddy of mine was designed specifically for these three challenges that I would like to enter:
1.) Simon Says Stamp Monday Challenge - B is for ( all my B's are highlighted in the post)
2.) The Mirror Crack'd - Wings (no cards allowed)
3.) Mixed Media Monthly Challenge - Birds of a Feather (So inspired by the incredible textures and sentiments)

Thank you so much for your visit.
Big hugs and Happy Crafting to you,
Lisa x

Friday, February 13, 2015

Clothing Optional.... (a DIY tutorial)

Yes, you read that right. Clothing is completely optional when it comes to this project.
 So take those pants off and let's get to work!
Actually, it's kinda cold here and we're expecting snow, so I'm gonna leave mine on, So, go ahead and stay warm, but grab that old pair you've been holding on to that you want to recycle because we're going to make gift baskets!
I made both of these yesterday in about 2 hours. 
Super simple, super easy and super fun!
Here are a couple examples of uses you could use these for....but oh the possibilities.
Directions to assemble:
It doesn't take much material, so I estimate you could make 3 baskets just out of one leg.
1.) Cut desired length
2.) Turning inside out, sew up one end shut to form the base
3.) Turning right side out, begin the decorating process.
I decided to sew on a measuring tape for a Crafty Basket, but it would work great for Father's Day too!
I've cut off belt loops and added them to the top as well as buttons and pockets; it's whatever you want to use.
4.) Next add Mod Podge Stiffy-Fabric Stiffener (found mine at Walmart in the paint section)
Simply poured it over the material (only on the outside) and used a sponge brush to rub it in.  
5.) Using a heat tool I applied heat to quicken drying and hardening; making sure to shape jeans into a basket shape of sorts.
These stiffen really quickly and hold desired shape perfectly!
Here you see I've added floral foam in the bottom to hold elements for the gift basket.
And here is the other that I made.
6.) Simply add a tag and some goodies and viola, you have a recycled and useful gift.
Or you can fill them up with fun stuff just for you!
Hope you've enjoyed this idea and will give it a go yourself. I'd love to see your ideas if you do.
Hugs to you all and have a wonderful weekend!
Lisa x

Wednesday, November 19, 2014

NASCAR & Glass Jars...Let us All Give Thanks....

Hey ya'll! Welcome back to my blog..
Here's a little Autumn centerpiece I'd like to share with you today.

It's been a fun month guest designing with Serendipity Stamps and I am so happy to share with you my last project where we were asked to recycle or repurpose something for the holidays.
Boy howdy was I ever excited to get started.
I began by choosing the most fabulous Floral Dragonfly Die and Stamps Set, Pumpkin Die, and Wheat Sheaf Cling Set as my inspiration.
Steps;
1.) Cut several die cut pieces out
2.) Spray backside of die cuts with repositionable adhesive spray
3.) Adhere die cuts to glass jars and secure firmly
4.) Spray jars in well ventilated area with  Rust-Oleum Frosted Glass
 
5.) Find an old serving tray or Nascar TV tray, like I have here, and cover it with 
6.) Let the paints dry and peel off the die cuts from glass jars and decorate.
7.) Plop a cute little tea light candle inside, light, and enjoy. 
  
8.) Don't throw away the original die cuts either. Find a twig from your yard or tree and stick the die cuts to them and add them in a and about your centerpiece.
I've also made a name placard to match the centerpiece motif.  
So there you have it.  You can take the girl out of the country but you can't take the redneck out of the girl! ;) 
Which is why I'll always be thankful for NASCAR, glass jars, spray paint and Serendipity Stamps!!
Hope this idea inspires you for creating your own recycled decorations. If so, I'm sure they'd love to have you join them over at the challenge blog for their Thankful theme.
 
This week’s sale is Free Shipping on any US order of $15 or more.
 Offer good through Nov 26.  

Ya'll are awesome and I'm so happy you stopped by. I am feeling MUCH better today so thank you for all your sweet comments, texts and calls making sure I was okay. 
Big HUGE hugs and happy crafting!
Lisa xx

Please visit these lovely ladies for more recycling and re-purposing ideas.