Saturday, June 29, 2013

Applying The Brakes...

Hello all you fabulous blog buddies!
Well, it's the end of the month and we are finishing up the personal challenges between Onion, Mitza Pitza and myself.  The final theme this go around was to 
Create 2 cards (Clean and Simple & Shabby Chic) Using Same Design or Colors....wow!!

 The above card is my Shabby Chic version using the below paper sent to each of us by Sue (Onion), our common element.  You'll find this paper in the flag and arrow on the left side of the fence in each card.

I thought it would be fun to repeat not only this shape and paper in each card, but the same main details as well and derive a completely different appearance in each; at least I hoped I would.
So next I "applied the brakes" and created my CAS version...
I had such an incredible time creating these projects with a few of my blog buddies and just as before, I cannot wait to see what Sue and Mitra have created for this doozie!
Thanks so much for your positive feedback and wonderful comments.  I can't tell you how much I appreciate you.
 Okay....it's a BUNCH!!!

Hugs n' Happy Stamping to you all,
Lisa xx

Tuesday, June 25, 2013

Oh crap!

"It's due, it's due and I'm late, I'm late...."
Sound familiar?  Deadlines looming and you're completely frazzled?  
Need a system of organization?
Then have no fear...Top Tip Tuesday has the solutions for you!
This go around we're hosting an Office Supplies Challenge where you'll find amazing creations using items found on a desk. 
Here is my handmade calendar using this amazing image Total Drama from Kenny K and a few Cameo Silhouette cut outs to complete the retro calendar theme.  
Now it's easy as 1,2,3 and I know exactly when those DT deadlines are to arrive :)
So join in the fun and come on over to Top Tip Tuesday and show us your creative ideas with Office Supplies and while you're there, you could be eligible for prizes from Kenny K and Crimson Cloud.


Hugs n' Happy Crafting,
Lisa xx

Monday, June 24, 2013

Nom, Nom, Nom.....

Here it is...my eternal temptation....chocolate!
I love it! I even love it on bacon, believe it or not...it's amazing!!
However, this is the best sort of chocolate if you're on a diet as it's calorie free, yet looks amazingly YUMMY and it even holds a gift!!


This gift holder here is titled Strawberry Treat Box
from 

Also a little extra sentiment added to the backside of the container that comes from the cut file,
Berry Sweet Greetings; which features over 61 images!
Remember, if you leave a comment on our Wednesday blog posts that Regina runs, you'll be eligible to win 3 cut files of your choice, it's that easy!

Hugs n' Happy Crafting,
Lisa xx

Saturday, June 22, 2013

Counting Chevron Sheep....

Fabric Chevron Card 1
(Chevron pattern created using triangles layered on top of each other)
Besides knowing that I get to sleep in, Saturdays now have another fun highlight for me...it's getting to see and share the creations from Sue (Onion), Mitza Pitza (Mitra) and myself.  This Saturday's challenge was to sew a Chevron pattern on a card or project.  
The first card kept me up.  I kept mulling it over in my head, thinking I didn't much care for it. So I tried to ignore it and count sheep to go back to sleep.  Soon enough, little wooly chevron sheep were jumping the fence and running willy nilly into the pasture.
 That was it...I flew out of bed and created another cardstock chevron pattern with machine stitching.  
Not sure what it is about this one that I like better, but it was sufficient enough to let me sleep!

Scrap Cardstock Chevron Card 2
(Chevron pattern created using strips of scrap paper)

I thought it was a terrific way to use up scraps of paper too.  
I can't wait to see what my crafty buddies have come up with this time around. Hopefully they were able to sleep without being inundated with colorful trendy moxy fab sheep in their dreams.

Click here to see Sue's creations
and
Click here to see Mitra's creations 

Hugs n' Happy Crafting,
Lisa xx


Thursday, June 20, 2013

Our house is a very, very fine house...

Welcome, welcome, welcome!!
It's a beautiful day in the neighborhood and while Mr. Rogers' changes his shoes and sweater, I'll fill you in on the inspiration of this card.  I've made this using the adorable file House Shaped Card and Envelope from The Cutting Cafe.  You will not believe the incredible diversity of the cards my teammates have made this week!  From Shabby chic to hilarious, they're all fabulous.   
Now, this card....this is made for a special blog friend who recently posted some incredible news  on their page AND a before picture of their house and description of what they were planning to do to change the outside appearance of it.  I couldn't wait to try my hand at their creative endeavors, only on a much smaller scale and then send it to them as a little surprise.  Although I doubt it will come as a surprise if they read this post. So.....SURPRISE!!!!!!!!! early :)
Don't you love the color scheme here? I think it's incredibly fun and colorful and classy all in one and that's why the sentiment is included.  You'll love this person's blog, trust me, so head on over and check it out...talk about colorful and inspiring.  Here's the link here

Enjoyed the house? 
Catch the cut file and MANY more here at

Speaking of houses.... drum roll please....
Ta-DA!!!
I thought I'd share a little picture of our new house in the making. 
What do you think of our lovely indoor pool???  Nice, huh? Not!! LOL ;)

Hugs n' Happy Stamping, Crafting, Inking, Creating....
Lisa xx

Tuesday, June 18, 2013

Where's the Pig Roast??

Oh boy, is this baby ever late.  I was supposed to have posted this last week, but stuff happens and well, it's finally here in all it's crazy beachy glory.
The theme over at Top Tip Tuesday this round is Masculine and ummmm, I'm not sure I set sail too clearly with this card. However, in my defense, I did think of my dad wearing his crazy Hawaiian shirts and the process grew from there. I've included everything I could find except for the pig roast.  Thank you so much to Birdie Brown for offering up this cute little lighthouse that I've paper pieced for the center focal point.  Our sponsors this week are Birdie Brown and  Sweet Stamp Store, so hurry on over to submit your masculine themed cards and you'll be in the running for a wonderful prize and don't forget, if you leave a tip, you'll be eligible for two prizes!!
Also, I'd like to think Pia for her wonderful inspiration that gave me the motivation for this project as well. I was going to CASE her card, but like I said, I went nuts on this one.  Here's her card anyway because I wanted to give her credit and thanks for helping me out of a slump. :)

Hugs n' Happy Stamping to you,
Lisa xx


Saturday, June 15, 2013

A Mother's Love....


Hello there to you!
I just want to apologize for not getting around to visit this week. I'm just running so far behind on kid, house and family stuff that I've not seen my desk in over a week. I WILL be by to visit starting next week and I really look forward to it. I've missed all your inspiration.

Well, it's Saturday and that means it's time to share another Onion, Mitza Pitza and Quirks project.
Our theme this week to 
Draw Your Own Focal Image/Sentiment

Mother and Child
(Please feel free to download)
Sentiment created on the PC, also free to download

This week has been so much fun with the kids that they were truly my inspiration for this drawing and the sentiment. 
A very CAS style for me, but I hope you enjoy it.
Hugs to you all!!!

Please enjoy my wonderful buddies projects here as well :)
Onion (Sue's blog) here
Mitza Pitza (Mitra's blog) here


Saturday, June 8, 2013

Women Parts, Heart Attacks, Strep Throat and Bleach...

Well hello to you all! 
It's been a hell of a week so far.  
Absolutely love when my yearly physicals roll around all at the same time.  
Had to get my tetanus shot as it's been 10 years already, so had that in the left arm. Then the blood work was drawn for all the cholesterol and whatnot checks also in the left arm. While in the middle of thinking on this project, the phone rings and it's the hospital on the line and a very frantic and nervous woman asking me if I'm having heart palpitations and finding it difficult to move my joints.  No hello, no nothing, just instantly asking those questions. I said, "To be honest, I just started, right after you said that!"  She said, "You need to get to the Emergency Room ASAP, we think you're on the verge of having a heart attack."
 I said, "WHAT??? I'm not having ANY of those symptoms!"  
Apparently my potassium levels were red flag high and so I either could rush to the ER and have tests run OR I could go back to the lab and have the blood drawn again. I chose door number 2.
1 hour later, I'm back at home again, now with a completely sore left arm and a new puncture wound in my right arm, when the phone rings again.  It's the same lady from before; only this time, she's completely calm.  She begins by apologizing for alarming me earlier and then tells me that all my blood work is absolutely normal and my potassium levels are perfect; I am not going to be having a heart attack anytime in the near future.  Apparently, the phlebotomist  who drew my blood earlier, left the tourniquet on too long and that causes the potassium levels to rise.  I did not know that.... but now I do. 
Then it was off to have the boobies flattended...(Gotta Save Second Base!) 

So what does that have to do with me being a dork? 
Well, my arms are completely sore and my body feels like a human pin cushion, and when I went to the store to buy bleach for this project, I could barely bend my arms and this particular jar of bleach was the one I could reach.  

Our theme this week for Onion, Mitza Pitza, and Quirks this week is....
Use Bleach and Another Medium
Here's the ridiculous part.  After realizing that I wasn't going to have a heart attack, I set out to make a very fun and colorful tag filled with bleached stamped images. So, I stamped and stamped and stamped and guess what? Nothing! The more I stamped with bleach, the same the paper stayed. Eventually I finally yelled in defeat, "What the heck is the deal???"  That's when I spun the chair around to read the bottle and the jar I had grabbed was color safe bleach!!!! DORK!!!! No friggin' wonder it wasn't working. 
So now my poked and prodded arms are really sore as I've been pushing down with all my strength to get the bleach to take to the paper and nothing, not now, not ever....
But,
if you use color safe bleach on acetate, it really does give a beautiful charred brown appearance seen in the upper top right and lower left bottom of the tag.

The go anywhere tag was created by painting a butterfly stamp with acrylic blue paint and then adding a painted layer of REGULAR bleach on top of that and then stamping it onto the colored cardstock and you can see here that the bleach worked much better.  

My initial inspiration was the Tim Holtz 12 Tags of 2013 and the latest June tag here; which is why I decided on the dragonfly.  Upon further inspection, I really think the warped acetate and spastic coloring along with the sporadic movements and design, rather summarize the week I've had.

Next week I'm off to have my annual pap smear test run. 
 Last year, right after I had it done, they called to tell me that the results came in and I had strep throat!
Really????  

Thanks for letting me rant a bit...LOL...and for visiting. Be sure to check out what I'm certain will be the inspiration you're looking for over at Sue's blog here and Mitra's blog here.

Hugs n' Happy Stamping,
Lisa xx

Tuesday, June 4, 2013

The Burrr Brings Bouncing Babies....

Oh my goodness...apparently it was a VERY cold winter last year! 
Why and what does that have to do with this adorable cut file from The Cutting Cafe?
Well, seems like so many women I know are going to be expecting little bundles of joy in the next few months!!
Thought I'd better get busy making little gift boxes for the blessed events and Regina's precious file
  Baby Bottle Treat Box was perfect for the occasion!  
The directions are so simple to follow and the files convert easily on my Silhouette cutter.  
Mixing a few scraps of paper together along with baker's twine, wooden greetings and hearts, letter blocks, Washi flags, bird sticker and a homemade jute nest with liquid pearl eggs,  I was able to create this special little box that is gender neutral and will hold crocheted baby booties for the little cherished arrivals. 

The team will be showcasing the most wonderful baby themed items this week so make sure to earmark in your sidebar The Cutting Cafe Blog so you don't miss out on all the versatile files.  If you leave a comment on the blog post, you'll be eligible to win 3 cut files of your choice if your name is chosen!!

Thank you so much for stopping in and visiting.  
I have loved reading all of your comments and you all make me smile from ear to ear :)
hugs n' happy crafting,
Lisa x


Saturday, June 1, 2013

Just Another Brick In The Wall....


I think Pink Floyd sang it best....
It happens.  We've all been there. 
The elusive crafty dead end, slump, rut, brick wall.  
But if you've been following the journey of Onion, Mitza Pitza and myself (Quirks), you'll know that we're like the Blue's Brothers on a mission from God. No, we're not putting the band back together, HOWEVER, we are challenging and inspiring each other by using a specific theme each week and then impatiently waiting to see what we've all done with it.  This week's challenge is our third and it's...
Create Project Using a Homemade Stencil!!!!
Here's mine.

Ohhhh boy, this needs a face lift STAT!
I'm no surgeon, but this is my patient.  Here's how I've transformed it.
Recycling a plastic lid from a previous purchase. 
This is the material for my homemade stencil;  very sturdy and easy to clean after.
Cutting off the sides to make a flat surface area
Selecting a specific mask overlay design from the Silhouette Studio, I chose a wavy brick pattern.
Clipping homemade stencil onto white cardstock. 
You can see here I'm in the middle of spreading Lightweight Spackling to surface area.
Here I've removed the stencil and allowing it to dry. 
You'll notice the lines from the putty knife; easily sanded off when spackling dries.
The very first picture, above, of the brick wall, is actually the backside of the journal book.
Here begins the transformation of the front.
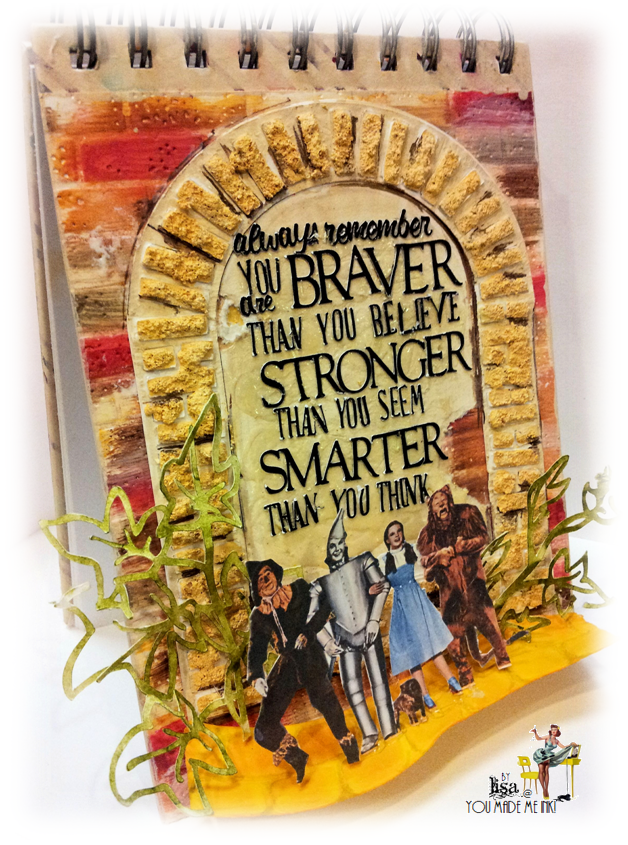
White cardstock was used to form the brick background with an embossing folder and several shades of paint from the TH Distress Ink set.
Now, a torn centerpiece that will hold the sentiment is applied.
I also cut out an arched rock window shape on the Silhouette. Initially it was just going to be painted, but the surface area was too flat for my liking and I really wanted a stone appearance to mix with the brick.  Using Snow-Tex and TH Antique Linen and Wild Honey Distress Paint, I was able to create the raised, textured and aged stone color I was hoping for. 

Once the stones were dry I painted in and around them with various shades of paint to highlight them and then also painted the surface area for the sentiment; which was applied with Glossy Accents.
Remember the homemade wavy brick stencil?
Here it is!! 
I really wanted that to be the focal  point of the journal, so I've attached it to protrude out from the surface and spritzed it with vibrant Lemon Zest Dylusions ink spray.
Now, I realize that these aren't exactly the words of the Great OZ, but don't you think they apply just as well??
So, of course, raised in Kansas, I had no choice but to add the Wizard of Oz characters to the yellow brick road. ;)
And there you have it, a newly transformed old journal with an inspirational sentiment and quirky style.
So save that plastic and design your own stencils and get inky, sticky and creative!!

I'm so grateful for your visit and I hope you're just as excited as I am to see what the other ladies have created with this theme!!!
To visit Sue's (Onion) blog, click here.
To visit Mitra's (Mitza Pitza) blog, click here.

Hugs n' Happy Crafting,
Lisa xx