Sunday, April 29, 2012

Get All Better...

Well let's see, another week gone by and now I'm looking at the butt end of April already!
 Man o' man did that month just whiz by. 
Well, we're finishing it off in style at the ever fabulonderful (like that new word? It's sure to catch on!)..
Make It Monday!
Joining in our linky party is the crazy talented
Who has graciously offered our DT the fun opportunity of using their digi's and is providing a lovely prize for our winner!
 I had the pleasure of using Nurses Heal and downloaded this crazy messed up kitchen sketch as her backdrop scenery.  I placed the copic colored Nurses Heal on foam squares as well as computer generated sentiments.  The syringe was labeled with rub on letters. 
Here's Mom after she's 'all better.' 
That's all I have to share on this little card, but I'd like to send a very warm welcome to my newest followers and tell you all that I just get the best laughs and smiles out of your comments.
As always, I look forward to sharing with you my... 
PICK OF THE WEEK!
Why do I like this card so much? It just makes me happy to look at it.  The fun contrasting, yet coordinating colors, the white background that highlights the cute image and the baker's twine to embellish is just so pleasing to the eye. 
Beautiful card Luanne and thank you so much for sharing it.
Sure would be neat'o keen if you shared your talent with us too, so if you have some time, hop on over to Make It Monday, the place where mojo lives! 
Take care, stay well and big hugs and happy stamping...
Lisa xx


Wednesday, April 25, 2012

One Is Never Enough...

When it comes to vintage digital stamps, I can't stop making them.  I love the versatility and the style.  You can change the size, the color, mix and match, leave them black and white or color them in and they all look so wonderful.  Which is why I chose this venue for our current challenge at
Craft Us Crazy; which is
FAVORITE STAMP COMPANY and/or FOUND INSPIRATION! 
My favorite inspiration has to be vintage images and I've chosen to use images provided by the lovely Pamela at Free Vintage Digital Stamps.  Here they are...

Beautiful You
The sentiment I designed on the PC and then printed it onto the cardstock.  Added the gorgeous free face image mounted over an embossed oval frame.  Placed this over the wonderful Be Mine paper from echo park, a lovely gift from Cathy over at Cathy's Creative Place ...thank you!!!  A pink bow and flower in her hair and there you have it, a fun and quirky card for a special female in your life.

 Little Reader
What a blast it was to make this little card.  I fell in love with this free vintage cutie.  Decided to only partially color the image, highlighting the little girl.  I needed some background writing paper and found this in a set of free downloadable vintage paper kit from Far Far Hill.    The library card is also a freebie from a set of four to choose from and they can be found here.  Stamped the sentiment from Kindness Matters and the pen tip from Established Elegance, both stamp sets from Stampin' Up! Finished up with a sheer blue bow and she's ready for the mail!

I Really Do
This particular card is self-explanatory.  I love free olives and quirkiness, you may have noticed that about me by now and so I designed a little card around them.  The papers are again from echo park, Be Mine 6x6 pad.  The olives are colored copics.    I thought a fairly direct and fun little card.
So, that's the trio, because one is never enough...

The Trio

 There you have it, my favorite inspiration and now it's your turn to show us what inspires you!
Here's the scoop...
Your favorite stamp company and/or Found Inspiration
(ie..others, Internet, other DTs & challenges..so forth) please post with your write up!

PLUS...
For the prize this challenge, our sponsor is Jeri herself!!!  NOOO, you don't win her, sorry.  I know she's amazing, but you don't get her.  What you do get is this...she is giving away a
$15 Gift Certificate to your favorite online craft store
(where online gift certificates are applicable)!!!
Okay, you can wake up now, I'm done.
Thanks so much for the visit and I hope you've found a little inspiration here.
Sure would love to see what rings your bell, so submit your favorites for our two week challenge.
High Five and Creative Musings....
Lisa xx

Tuesday, April 24, 2012

Bling Your Ring-a-ling...

Oh boy, oh boy, oh boy....
I am jumping up and down about the new challenge happening over at
Are you ready for this? You sure? Okay, here it is...
ANYTHING BUT A CARD!!!
I know, right!!  How freakin' cool is that?
Plus, there's a totally groovy tutorial from our very own hysterically funny and talented, Carol!
....could it get any better than that? 

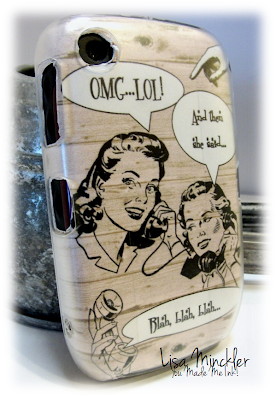
 Okay, so let's get right down to business...here's what I decided to do for this challenge.  I blinged my ring, with paper no less.  My phone is purple, and I do love purple, but the other day I was rummaging through a drawer and found the plastic case to my blackberry and I almost pitched it! GASP...I know, you'd think I'd of learned by now to save, save, save...but I was in one of those cyclone cleaning modes, luckily I had a moment of clarity and put it back.  SO glad I did.  When I read this challenge was coming up I couldn't wait to start this project.  I'm not proud, I would have dumpster dived trying to retrieve this, but what a relief I didn't have to.


Here's what I did.  
Measuring the plastic case, I approximated a rectangle of 3.25" (8.3 cm)  x 4.25" (10.8 cm)
Opened up Microsoft Word and inserted a background paper, here I've used a free wood grain paper from Stamp TV, and then sized it down to the above measurements.
Inserted these free vintage pictures that I love from Graphics Fairy (retro ladies talking) and Free Vintage Digital Stamps (pointing hand) and the female hand with phone (unknown origin) over the wood grain paper.  Lastly, inserted the talking bubble shapes and wrote the convo inside of them.
Printed and cut the image out and rounded the corners with a punch.
 Placed the picture inside of the plastic case and with a pencil, traced where the openings needed to be cut for the button access and then cut the openings. (Don't look too closely, they aren't the cleanest cuts.)
Popped that bad boy back in there and viola! Le new decorated phone case.
 For just a bit more appeal, I printed out a second page of the image and then removed the plastic cover on the front of the phone, traced it and cut out a little bling for the front as well.
The image is a picture I took at the mall, while shopping for Converse for my son.  We compared a baby shoe to his current shoe...size 13!  Sniff, sniff....they grow up too fast.
Thank you to our extremely generous Sponsors for hosting the prizes for this challenge.
 $25.00 to spend in their store...WOW!
 4 stamps of their choice...WOOHOO!
(clicking images will take you to their stores)
 Here is the image I created and free for the taking if you're interested.
Thank you SO much for stopping by and I do hope you've been inspired by this cell phone vintage revamp.  We'd sure love to see what you create that is NOT a card too.  Stop in and enter your 'WOW...that's AMAZING" creation with us at Top Tip Tuesday.

Hugs and Happy Creating...
Lisa xx

Monday, April 23, 2012

Big Hugs...


 I'm in love!
This card created itself just by looking at this super-duper adorable image,
from Karen's Doodles
I've placed two circle scalloped pieces on either side of a standard circle card, added a hot pink bow and foam mounted the copic colored image.  It was perfect! Except for the fact that it kept falling over, as the larger scallop in the back was being the culprit.  So, I created the sentiment, cut it out into a banner shape and tucked two edges inside the scallop holes on the front and viola, instant stand. 

I think this could make anyone smile, but I'm hoping it makes a child smile because that is our theme this time around...
ONE FOR THE KIDS! 

It would be wonderful to see all your creations designed just for kids, so I hope you can make it over to our challenge at

Have a great one and BIG HUGS!
Lisa xx

Sunday, April 22, 2012

I'm Not As Think As You Drunk I Are...

 I don't know how long it has been since I've sat on a lavish divan wearing a shimmery and elegant evening shirt while sipping on a martini.  I think the last time was never. 
 For years my finest attire was a t-shirt adorned with baby drool, playdoh remnants, bleach stains and specks of paint; which matched random sections of my hair.  One must at least attempt to coordinate.  The wonderful thing about said gittup was that every other stay at home mommy looked identical.  There was really no need for verbal interraction with each other back then.  One look at the outfit and you knew exactly what they'd done that day. 
I liked to refer to it as "textural communication."
(Hmmm, I'm thinking this would make a cute card for a new mom. A t-shirt with lumps of who knows what on it.)
So when I saw this darling diva all chilled out, I thought it would be a cute idea to make a little container to stash some fun money in for a girls night out.  No kids, no shirts designed by Mac n' Cheese or Cheetos....just a fun filled evening of giggling with the gals and tying on a martini or four. 
I've used a recycled can of wasabi peas and seaweed something or other; it's a fun snack, to make my little night out nest egg.

Motherhood is the most wonderful job I could ever have, but a night out on the town would most certainly be well deserved.  I can already see it now, a group of friends sitting around the table, sipping drinks, being served our dinners and as the clock strikes 8, we're all yawning and ready to go home and get back in our flannel pajama pants and t-shirts!   Ahhh, life is good. :)
Do you have something recycled, old or new project?  Something painted, something stitched, something masculine, something femine something out of this world you'd love to share with us at Make It Monday?  We certainly hope you do and we'd love to see, so please stop over and join in the 'ooohing and awwwwing' that happens daily at...
And a huge thank you to
for providing the DT our inspiration and wonderful prize to the winner this week!

Drumroll please.....
PICK OF THE WEEK
Holy crud, I couldn't pick just one...seriously, if I had the room, I'd show you them all, but here are the top 4 that I finally narrowed it down to.  Click their names and it will take you directly to their blogs.

Amazing inspiration and mojo here!

I truly appreciate your visit and the time you spend to leave me a "howdy." 
Hugs and Happy Stamping...
Lisa xx

Saturday, April 21, 2012

Dinner And A Show...

What a blast it was making this card!  I hope you'll tap into your creative mojo and find time to join us over at The Squirrel & The Fox for a very special challenge.
Here is why...
"April 25th, this Wednesday, marks a very special day in Australia, ANZAC Day. ANZAC stands for Australian and New Zealand Army Corps, and the soldiers are known as ANZACs. It is a day of national remembrance, a chance to commemorate their soldiers that died in military operations.
Many people remember our ANZACs on this special day by baking ANZAC biscuits. These biscuits were baked by the wives and mothers of the soldiers in World War I, and sent in food parcels to those fighting in the trenches. Made with oats, golden syrup and coconut, they are still an Aussie favourite today." ~ The Squirrel & The Fox Blog

Which is why our two week challenge is all about
FOOD!
With our ever wonderful, Zoe from
Make It Crafty
who is generously sponsoring us and offering a fantastic prize for our winner!
When I saw this table and chairs set from Make It Crafty, titled Paris Elements Digi Collection I knew I wanted to use it for this food theme.  Although you don't actually see food on the table, my hope was that with the sentiment and the cups, Victorian vase and romantic setting, dinner would be implied. 
I've set the entire card to be white on white and only colored the seating arrangement with copics.  I had hoped that using this adorable couple in the background, it would appear as though he's taken his lady to a very quaint setting for two.  The table setting, vase, cups and couple are all free digital images from The Graphic's Fairy.  The sentiment was generated on my PC using Jellyka Delicious Cake font. 

Now for the show part...
I have to take a moment and share a proud moment about my eldest. He recently debuted his talent at the high school Mr. Panther Talent Show and won
Best Talent and Mr. Congeniality.
If you'd like to watch the performance below, we'd be honored.
My son, Brendan, is the tall magician.  This is a skit he wrote himself titled, "Abra-cadavre."
Enjoy!


The YouTube link is here.
I hope you've been inspired by this card and it has spiked your interest to join us for this incredibly fun challenge of food.
Thank you SO much for stopping in today and I hope this finds you all well.
Hugs and Happy Stamping...
Lisa xx

Wednesday, April 18, 2012

Cruisin' Vintage Style

If masculine cards are not your forte, you're not alone, it's not mine either. However, a great challenge is one that makes you face your nemesis and so that's exactly what the ladies over at
Our Creative Corner are doing this week for their challenge.
The minute I read it, I knew I had to make a card about cars.  The theme is...
Men's Passion, Hobby or Interest.
How flippin' fun is that? Sooo fun!
 So, here's what my man loves....
CARS!!! 
If it's got wheels, an exhaust (loud preferably) and goes 0-60 in some stupid crazy time, he's all about it.
I researched the new 2013 Boss 302; which he is currently drooling over, but I couldn't find the exact picture I wanted, so I changed gears (Ha! I just made an unintentional pun there) and went with a classic '57 Chevy. 
The background is a cool image of a garage and coffee shop back in the good ol' days (coffee is another passion of his) and thought it would make the perfect backdrop for this red beast.
I printed the car out twice, cut out the silver fin and wheels from the second picture and layered them over the first for more depth with foam squares.  Placed the old $0.15 magazine image the SoCal ad, Missouri map, route 66 Missouri sign, Cruisin' sign, the Fire Chief gas pump and silly sign that says "Still plays with cars" and I thought I was done...LOL!
Silly me,
You can't put a car on display without a sweet wax job, duh!
Can you see the gnarly shine on that red boat? That's the handy work of my husband using Glossy Accent!  He was right, that looks sooooo way better.
 Anywho...that's my card and I had a fantastic time creating this vintage masculine card for the challenge theme over at Our Creative Corner here.
Maybe someone else out there can relate to their man's love of cars.  I don't get it.  Then again, they probably don't completely grasp our love of colored sparkly glue either.
Touche!
Hope you're having a great week so far!
Thanks for Cruisin' by my blog....

Lisa :)

Sunday, April 15, 2012

You Stack Up!

 Welcome back everyone! 
 I have a wonderful image, a picnic table tutorial and a super fantastic linky party to share with you today.
This yummy entree is called Big Burger and available at Meljen Designs.  I had such a wonderful time coloring this monstrosity of a meal and decided it needed a unique scenery to show it off, so I designed my first 3D picnic table and free standing banner.

 Here are the dimensions and directions to make this picnic table yourself.

With white card stock, make the following pieces:
Table Top - 5.5" x 3" and score each side at 0.5" in from the edges
Benches - 5.5" x 1.5" and score each side at .25" in from the edges
Center Support (2) - 4.5" x 2.5" and score each side at .25" in from the edges
Cross legs (4) - 3" x 0.5"
Tabs - Picture shown below and is used for the benches to sit on.
1.  After you've cut and scored all the pieces. Snip the corners to make the little tabs that will be used to fold, glue and form the table, benches and support.
2.  Run each piece through a wood grain folder
3.  Ink the wood grain to desired color
4.  Once the two support pieces are folded, spot glue with a hot glue gun and adhere both sides together.
5.  Assemble pieces as shown in the photos.  After adding on the legs, gauge how you want to the ends cut at a angle to sit level on any surface.
6.  Cut the little white tabs, shown above, and mount the benches on to them.
7.  Spot ink on the underside where white is still showing to match the appearance of the table.
Now you have a picnic table!

I'd like to share now my,
PICK OF THE WEEK
I'm swooning over the textures and layout and the center stage sentiment as well as the beautifully colored couple! 
This stunning piece of artwork is from Alyce at Kit and Clowder if you'd like to see more images of this gorgeous project.

We would LOVE to have you join in at
for our always fun and inspiring Linky Parties!
 Thank you also to our Sponsor
for providing the DT with images to use and for gifting the winner a wonderful prize!

I hope I've inspired your creative mojo today.  You always make my day with your visits, so thank you for stopping by.
Hugs and Happy Stamping!
Lisa xx

Wednesday, April 11, 2012

Bouquet For Mom...

Well, it's time again for another 2 week challenge and
I have for you today, this fairly CAS card designed for our theme at
CRAFT US CRAZY; which is...
MOTHER'S DAY and or FLOWERS

I've made three paper spiral flowers and two foil flowers and one ribbon flower then added a wire stem wrapped in floral tape.  Tied a little bow around it and added the Mom tag.  The tag and card are both scored for a little more interest to the white cardstock. 

I hope this has inspired you to join us with your creative ideas and show us what you come up with for our theme.  I know Mother's Day has already been celebrated in other parts of the world, but flowers are ALWAYS popular on cards so hop on over and share your creations with us!

Thanks for taking a look...
Have a great day!
Lisa xx

Thank you also to our wonderful Sponsor
for providing inspiration and a prize to our winner!


Tuesday, April 10, 2012

Blissful Moments...


 Hello there!
I'd like to introduce you to Molly and Sam; Love 4. 
This cute little guy giving his little lady a piggyback ride, is a wonderful image from our Sponsor Stamp Fairy, and they are helping us out at Top Tip Tuesday for our challenge theme of
Spotty Dotty
 For this challenge I paper pieced Sam's overalls and Molly's shirt and copic colored the rest.  I've added little white dots for accent on the clothes and then dotted a background around the couple and a spotty dotted button in the center of the bow.
The hues of the clothing leaned more towards earthy textures so the background is brick embossed foil with a layer of corregated cardboard and then a layer of burlap.  All of these items were purchased at Linda's wonderful Zibbet store, Linda's Funkie Junkie Boutique.
I tried to leave the sentiments fairly vague so that this card would be versatile for many occasions.
Sure hope you can drop in over at Top Tip Tuesday and check out the wonderful tutorial from our very own lovely, talented and funny Annette! She's done an incredible job showing how to make A Box In a Bag Tutorial!
Thank you to our ever generous Sponsors also for providing not only images for the DT to use but also for providing the prizes to our lucky winners!
Big Hugs and think spots and dots....
Happy Stamping...
Lisa xx