Tuesday, August 30, 2011

Dabbling In The Shabby...


Shabby What? 
Hello!
I'm glad you stopped because I have a fun and unique challenge to share today.

It's Tuesday so that means that over at

Our challenge this week is....

SHABBY CHIC
If you're like me,  you just said, "huh?"
I had heard of it, but actually doing it was a whole other thing.

I asked a great cyber blobbing guru friend of mine, Sue, 
who is fantastic at doing Shabby Chic"ish" type cards, 

 "What exactly is Shabby Chic?

This is what she said...

"Almost anything is acceptable and there is no particular style"

She also added some guidelines.
* The cards are always made up of Pastels
(soft whites, pale pinks, muted grays, pale blues and greens)
Distressing
Vintage ephemera - lace, pearls, beads, old paper, flowers)
Add something 3D

Basically, take something new and make it look old.
For more of Sue's inspiration check out her blog at

Now if that hasn't got you running to your craft table yet,
check out TOP TIP TUESDAY'S amazing sponsors!

Digital Delights
3 Digital Stamps to our Random Org Winner

  &

Ooh La La Creations
1 CD to our Top Tipper

We also have some CRAZY AMAZING inspiration from our Design Team Members,
 so be sure to check them out and leave them some love.

And as ALWAYS, not only can you WIN a prize if you enter your card into our current challenge with Mr. Linky, but you can ALSO be eligible for an ADDITIONAL PRIZE if you have a TIP you'd like to SHARE.  
All you have to do is write your tip somewhere in your post and then when you link your project at 
TOP TIP TUESDAY, be sure to ADD TIP by your entry name and wa-la.....
Instantly you're IN the drawing!

Here is my inspirational photo


Here is my Top Tip Tuesday DT card
Front View
Inside View


Stamped an image, border punched the edge and fan folded a piece of vintage paper

Printed out a digi onto DP and then fan folded butterfly and added gems


Side View

Ok, it's all over to you now.
The possibilities are endless and we really look forward to seeing your interpretation of 
SHABBY CHIC

Supplies I used are:
Card measures 4.5" x 6"
4 DP papers from stash (Shabby Chic is perfect for using scraps)
Key and flower tags from K&C Co., LLC
Doily (Fancy Wal-mart purchase)
SU! Paper for the fan (Designer Series name unknown)
Spellbinders Nestabilities Fancy Tags
Cuttlebug Embossing Folder - Chandelier
Digi Images (butterflies, woman's image, image on the fan) all FREE
from Shery K. Designs.
Stash - Button, ribbon, pin, gems and roses
Stamp - Art Impressions G-2542; Eiffel Tower
Ink - SU! Close to Cocoa, Basic Black
Border Punch - Scallop Trim Border

Challenges I'd love to enter:
Stampin' Sisters in Christ - #104; Recipe (ribbon, button, swirl, hat pin)

Sunday, August 28, 2011

Wish You Were Here...

A lot to share, so sorry for the looooong  post...

Sneak peek of my Make It Monday DT card

But first,
It's Monday so that means
Challenge Time at

As always, our theme is ANYTHING GOES and the lovely sponsor
for this week is...

and she is generously offering this...
to our winning commenter!
But WAIT, there's more.
Annabelle Stamps is also celebrating their 2nd birthday in September
and they're having a HUGE party!
Click below to check it out!!

Photobucket

She would really love it if you grab this blinkie and add it to your blog too!

Now before I show you my cards, 
I'd like to present you with my 
Pick Of the Week
from all the wonderful entries at
Make It Monday

Here it is...

Thanks so much  Grace for sharing your amazing talent with all of us!

Okay, about my cards...
I thought I'd lost my mojo the other night when I was trying to come up with a DT card.
After looking through a bazillion-jillion books and pictures, I decided that I'd just settle on a sentiment and go from there.
I chose this sentiment,
"Wish You Were Here"
My inspiration for this sentiment is my husband, 
who is currently serving overseas, and I thought it would be perfect.
 To challenge myself a bit,
I decided to repeat the same sentiment and change the images.
Here's what I came up with.

Sentimental, Wish You Were Here
I intentionally skipped a tree and only left the stump

I used the thumping method to color these trees

Cute, Wish You Were Here
Sentiment is on the inside
(disregard that I accidentally stamped her neck onto her face...oops!)

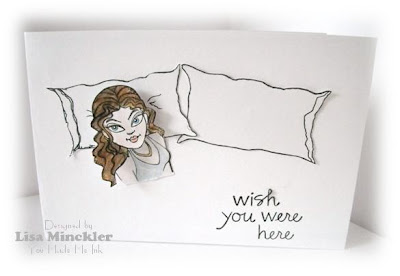
Flirty, Wish You Were Here
I didn't have a pillow stamp so these are hand drawn.  
Which is why it looks like he has a California King and hers is a chicklet. 

and lastly,
Humorous, Wish You Were Here
Sentiment is stamped on the inside.

Here's a little tutorial on how I made the bird

SU Owl Punch for base
Additional owl for the feet color (but I took pic of wrong side)
Placed over the feet
Cut off top portion to round out the body
Punch circle for the head (add 3D dot)
Punch out belly color
Punch out beak (small heart used here)
Add the wings
Add the "where'd you go" eyes
The End

Phew....
You made it to the end!
(okay..you can wake up now, I'm done)
Thanks so much for popping in and I hope you've enjoyed the post.
Happy stamping...
Lisa xx

Supplies: (For all cards shown)
All cards are standard A2; 4.25" x 5.5"
White cardstock from Wal-mart (purchased in the printer paper section)
Stamps; Lovely As A Tree, All in the Family  - Stampin' Up!
Hampton Art - Wish You Were Here sentiment
Ally (or at least her head) - La -La Land Crafts stamp
Colored cardstock from stash (personal mission to use it up)
black twine
Stampin' Up! Inks - More Mustard, Peach Parfait, Creamy Caramel, 
Bordering Blue, Bliss Blue, Brocade Blue
Watercolor Pencils from SU!
Thin blue wire (unknown origin)


Tuesday, August 23, 2011

It's Raining Men...


He's Bringin' Sexy Back


Yep! You read it right, it's raining men...
I've heard of cats and dogs and buckets,....
but men? 
Oh my!

No, don't go running outside just yet. ;)

Because today is another creative challenge at

So without further ado...


Introducing our gracious sponsors....


Our Random Org Winner
&
Top Tipper Winner

Awesome, right?
Well, before you make a mad dash to your door,
Here's a bit more inspiration...


 My take on the masculine challenge over at 

This is the front of my Twist Easel Card

The base of the card

Opened up and placed together with the twist

I'm sure by now you have a plethora of creative masculine ideas
 just jumping to get onto a card,

So head on over and try out our Masculine Challenge at 
Top Tip Tuesday 
and be sure to check out the other amazing DT cards 
that were created just for your inspiration!

Happy Stamping...
`Lisa` 

Okay,
NOW you can run outside!!

 Supplies Used:
Assorted paper from stash
Digi Image from unknown origin

Challenges:
Bunny Zoe's Crafts - Easel Card
Cards For men - #17 Masculine
Craft Your Passion -  #72 Sarcastic or Funny


Sunday, August 21, 2011

Something's Wrong With My Bottom...


Hello fellow crafters out there!
I have some wonderful news to share.
 I was recently selected by the amazing women at 
Make It Monday 
to be part of their DT team.
 WOO HOO!
I'd just like to say THANK YOU to all you wonderful ladies 
and I do hope that I can keep up with all your amazing talent.
 Okay, on to the business of the day...

My DT Card...
Ruffled Bum
I'm 40+ and to this day, I'm still asked by my aunt,
"Do you remember what you said while I was walking down the aisle to be married?"
My response is always, "LOL...yes, I yelled out,
 'Something's wrong with my bottom!'"
(Piano player screeched to a halt since she couldn't be heard over the laughter and my aunt, after coming over and hugging me, had to do a "re-do" entry) Ahh, good times.
  
While making this card with all the little ruffles, it reminded me of when I was little and my family seemed to be obsessed with dressing me in ruffled, foo-foo, underpants.  
What gives?  
Horrific fashion faux pas, in my opinion.  
However, it does inspire me to make a polyester argyle card as well...
but that's a different traumatic childhood memory for another time.

I digress...

SO, today at

We are hosting another challenge with many unique and wonderful DT inspiration cards 
of all shapes, sizes and variations!
You don't want to miss this one.

Our generous sponsor for this week is none other than...
Who is offering our lucky winner a
 £10 voucher to spend in store!

Be sure to stop by and ...
Remember, to be in the running to win the prize from our sponsor this week
 just leave a comment for another entry.
Be sure to mention you saw them on Make It Monday

 The more entries you comment on, the more chances you have of winning!!
It's all about sharing a little blog love. We all love comments............right?!

Now, on to sharing some love myself.
As extremely difficult as it was to narrow it down to one,
this is my pick for the week of entries into the Make It Monday challenge.

Introducing....
#221 Designed by Wendy Foster

Way to go Wendy!
Isn't this amazing???? Yes, yes it is!
 I find your card completely inspiring and the scenery is absolutely original
 and so uniquely creative! 
Well done :)

Ruffled Bum (sorta) Side View
I didn't have any blue tulle, so I dissected a blue paper rose and cut the petals into sections and placed them around the edge to have a "tulle" type of appearance.
You know, this cute little image, Peekaboo,
from Karen's Doodles, has really grown on me.
Even though I may not have enjoyed the experience of sporting all those ruffles around,
this little ballerina in her tutu is just too precious!

I can only imagine that my family felt the same way about me 
and I'm pretty sure that I spent quite a bit of time in the exact same pose going,
"Really, REALLY...again??"

Thanks SO much for stopping by my blog today and I hope that you've found yourself inspired.
It would also be comforting and fun,
if when you left a message,
 you could share a childhood memory along the same lines.
I know I'd love to read them and I'm sure the other readers would love a giggle as well.

Take care all and happy stamping! 
Lisa xx

Ingredients for this card:
Digital Scrapbook Experts (DSE) free ballerina image duplicated to make DP
Sentiment typed on PC
Outdoor Denim Ribbon from Close To My Heart
Roses; prize from blog candy (thank you, Linda Bronson)
Inks: Bashful Blue, Blush Blossom, Bordering Blue and More Mustard from SU!
3-D dots, Tombo adhesive, Fiskar paper cutters


Tuesday, August 16, 2011

Thank You.... A Latte!

A Little Coffee With Your Creamer?

Hi everybody!

I had so much fun making this card.  
It's my first ever, digitally designed, layered and layout on the computer, card.
I am really surprised and happy by the way it turned out.  
My question is...why haven't I done this before??
This card is my DT card for Top Tip Tuesday because today is...

CHALLENGE TIME!

Here's the scoop...


We'd love to see all the many ways that you can think of to say, "Thank you" to someone near and dear to you and remember, you can submit up to 3 entries.

Also...
Inky Impressions
&
Dew Drop Craftz

ALSO..
Stop by Top Tip Tuesday to awe at Maggie's amazing 
Center Step Card Tutorial!
Here's her sneak peak!
Thank you so much for stopping by my blog and I hope that you join our challenge today as there is never a bad time to whip up a card and say THANK YOU!!

My DT Card


Happy stamping....
Lisa xx

Supplies:
Inks:  Stampin' Up! Close to Coca for edging borders
Paper:  J Baechtold downloadable DP and Alphabet
            Shabby Princess Downloads (located via DSE; Digital Scrapbook Experts)
Other: Offray ribbon, buttons from stash

Challenges:
Karen's Doodles - Fancy Folds
Make It Monday - #50 Anything Goes
Paper Playtime - #53 Anything Goes
Stamp-N-Doodle - Fancy Folds