Sunday, September 30, 2012

Holiday Wishes & Kisses

Uh oh! Someone got caught stealing a kiss under the mistletoe...would you look at those blushing cheeks.  They are such a cute little couple, but the longer I look at them now, I almost think I've made a Christmas card with two poor kids who REALLY have to go potty!  Didn't see that before, but now that's all I see...LOL.  ANY-way, it really is a holiday card designed with white on white and the only colors being the focus on these two cuties. If you'd like to send someone wishes and kisses too, you can find this adorable little duo at Digi My World called, Mistletoe Kisses.  Digi My World is our sponsor this week at Make It Monday, where we are kicking off another wonderful linky party. So come on over and share whatever paper craft items you'd like, with us, and be in the drawing for a chance to win a $10 gift voucher to their store. 
 
I can't wait to show you now, my....
Joey at Joey's Stuff 
LOL! This is such an adorable card with a sincere apology filled with humor. I've had a nutso crazy week, but FUN, and I'm sure in my tornado whirlwind mode, I managed to torque someone, so I should probably CASE this card!  Joey, this is wonderful and thank you so much for the laughs and for sharing it with everyone at Make It Monday!
 
Thank you for visiting me! 
Be sure to grab some mistletoe bundles and spiced cider on your way out and just in case, bathrooms are down the hall and to the left. :)
Hugs n' Happy Stamping...
Lisa xx


Saturday, September 29, 2012

Corn Husk People & Baby Blocks Go Country

Yee Haw!!!  This hars the weekin' n' I'm as giddy as a sow in slop! I's reckon yer wonderin', "Why in tarnation is she ramblin' on in her native tongue fer?" WELL..it's because I'm so stoked about our latest challenge happening over at Our Creative Corner! Our very own lovely Liliana has set a theme, so close to my heart, of
Let's Go Country & Use Some Plaid!! 
 Waa-Hoo!  I didn't have to reach far for this one as I reside in the resort,Villa de Podunk, but the process of creating this frame was insanely fun and I hope you like the outcome.  So grab yer pitchforks, them milking pails, overalls, sexy green tractors, and your love of art and creating and come on over fer a spell.  We'll leave a light on for ya!  Liliana has graciously included this inspirational photo to assist in your creative endeavors.  This doesn't need to be just a card, she'd love to see projects too!
I drew inspiration from the dried corn husk textures in the back, the white of the dishware and the scenery itself made me think of a wonderful gathering of family.
 
Here is a basic "blah" brown frame that I've applied patina colors to.  Even did a little powder embossing on the edges with TH's Ultimate Grunge stamp.
These were colored letter blocks (3"x3") that I found at a local thrift store. There were 5 of them for a quarter...MINE!  I sanded them down, filled them with Patching Plaster, let that dry overnight. Sanded them again to level out the plaster, then coated them with a light spray of clear sealant.
This little bird house was given to me by my Mom (She's an avid flea market junkie too) because she thought it had project potential. She was right! It housed the cutest little corn husk family.
Here is their new home. Surrounded by spare corn husks that fell randomly from the sky when the local farmers were burning off their land, again...MINE! A few berry sprigs snipped from a wreath I felt had ample to share and that little plaid and raffia bow.  The plaid is an old dishcloth that I soaked in coffee and married with another country element. The pinecones, well they are just all over the yard.
The blocks got a new life by printing out the words on my PC in 3" x 3" squares, rounded the corners with a punch, mod podged them onto the blocks and then stained the corners lightly with TH's Antique Linen DI. 
These hearts were THE coolest things to make. Using a recycled tea can, I punched out hearts with  SU's  Heart to Heart punch.  THEN, first time for me ever, used my new Adirondack Alcohol Inks (Rust & Espresso) with the Adirondack Pearl Mixative; purchased at The Funkie Junkie Boutique, to turn silver into these gorgeous country feeling hearts.  I dry embossed them a bit to look like punched metal.  That's it!  All made from cheap finds, freebies or recycled products.
 
If you've made it this far in the post then hopefully you're inspired and  anxious to get started on your very own country card or project!
We'd LOVE to see you there. Please visit my incredibly talented teammates as they also have some amazing country inspired ideas for you too.
Heaps a Hugs n' Happy Crafting...
Lisa xx
 
Theme:  LET'S GET COUNTRY!
(Use some Plaid too)
 
NEWS * NEWS* NEWS
Coming in October, Our Creative Corner will be revealing a brand new element.  We are replacing our Guest Designer spot with Top Talent Thursday. What does this mean? It means, the entire day, our spotlight will be on a specially chosen winner!!  Want more details?  You'll have to check back in October and see what the buzz is all about. Submit your entries and the stage could be YOURS!


Wednesday, September 26, 2012

Yes Santa, we've been good!!

 
I've seen a gazillion ideas out on the world wide web of ways to creatively wrap a gift card or money for the holidays and one of them was to make a miniature stocking.  I didn't follow a pattern here, as I sort of prefer to 'wing' it myself, but here is a brief photo tutorial on how this particular one was made.  The fantastic Christmas image seen here is from Nicecrane Designs, called So Adorable Christmas and available in a set from Ignacio's store.  I chose to leave the image in black and white and accent colors around it.
Using the freezer paper transfer method, I've printed image out onto fabric.
Positioning image to far right to give ample room for front and back of stocking.

Fold material in half and hand draw stocking shape around image.

Cut material in half

Pin pieces together to cut out shape.

Cut stocking

Form the hem and attach lace for front of stocking.

Sewn hem on front and back of stocking along with a fabric handle.

Both sides sewn together and now to decorate and attach the hanging handle.
 
Like this image? You can receive the whole set here.
 
Hugs n' Happy Crafting...
Lisa xx


Tuesday, September 25, 2012

You've Been Boo'ed and Tutorialed Too...

Do you Boo in your neighborhood? It's one of our favorite activities during the Halloween season.  If you've never boo'ed before, here is a link with 16 different excellent ideas for booing! Just remember you need to be stealthy and not get pulled over by the cops like we did...LOL! 
  Since October is just around the corner, I thought I'd get the "secret" gifts ready early.  Thanks to Shape EZ's templates, the task was easy and fun.  Here I've used the EZ Roll Bag and added some handmade decorations.  This will look adorable filled with candy as a centerpiece inside a $1 General bowl filled with MORE candy and instructions for them to BOO too!  I think it's a terrific way to package some food for a fun holiday and we'd really love to see what creative ideas you have for packaging food too. 
Some come on over to Top Tip Tuesday for our current challenge
GOOD WITH FOOD!
We have tutorials from our outstandingly creative Elaine (you HAVE to see these) and our sponsors Whimsy Stamps, Crimson Cloud, Shape EZ, and The Crafty Pad, all have prizes they're anxious to give away to our winners. So come on down! Bring your appetite and creative ideas and join in the fun!
For those of you who would like to stay and read my tutorial on how to combine digital paper, templates and decorative digital images together, as seen on this project, (only if you want to), I've included it below.  For those of you who have to mosey along now...thank you so much for your visit!
Hugs n' Happy Crafting to all,
Lisa xx
 
TUTORIAL
Using Microsoft Office Word
It seems like a lot of steps and I don't mean to belittle anyone's intelligence at ALL, I'm just crossing T's and dotting I's to make sure I show all the steps. It's actually quite easy. Don't let the pictures intimidate you if you haven't tried this before. ;)
 
Step 1
Open Microsoft Office Word
Select "Insert" then select "Picture"
 Step 2
Open up the folder where you store your favorite digital papers and select your desired color and pattern.
 Step 3
Here it is! Now enlarge the size to your desired needs.
 Step 4
By selecting "Square" you are allowing the image to move freely and "share" the page with the other images you insert. If you skip this step, you'll bump the other images off the page.
First place your cursor on the paper and click it to "highlight" that your next command is directed just for the paper. ;)
 Step 5
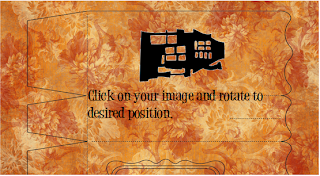
Now we are going to add a template of a box shape to the paper..just like my project.
Again, select "Insert" and then "Picture"
 Step 6
Computer will guide you to your folders where you'll select the template you wish to use.
 Step 7
Again, take your cursor, click on the box template to "highlight" that the next command is for the template, then see picture for further directions.
 Step 8
You'll notice that your template has a vibrant white background..ICKY! You don't want this. You want it to use the pretty paper you selected.  Here's the easy steps to do that.
Under the "Picture Tools" Tab select "Recolor"...
 Step 9
 Step 10
 Step 11
You can change the size of your image to fit better at this stage too.
 Step 12
 Step 13
Final step!
Congratulations! You've made it through my verbocious (one who is extremely wordy, but not annoyingly so..LOL!) tutorial.  I hope this has helped you work smarter, not harder and given you a little extra time for more crafts!!
 
Take care and have a great day,
Lisa xx

Monday, September 24, 2012

I Swear, The Cat Did It...

Oh so innocent and angelic, this one!  Who in their right mind couldn't forgive this sweet pup even if she did completely anihialate your homework and shoes, and magazines and couch, and drywall and door frames and...well you get the idea.  Meet the darling new image from Lynne Stansbery called Tennis Ball Anyone?   You know you'll think of sending her to the corner, but in reality, you'll take her outside and throw that tennis ball to her heart's content.   However, if you really need to put something in the corner, then Squigglefly has the perfect challenge for you.  This week are asking to see how you Go To The Corner.  Here I've decorated a corners with three brads,a mini clothesline clip, miniature chalkboards, Bo Bunny papers and the last with a scanned sheet of homework from my son when he was younger  (more doodled drawings than anything) and printed it out to scale for this card.  The inside is decorated as well and left blank.  I haven't categorized this card because I felt it would be suiting for an I'm Sorry or I Miss You, or just a good laugh.  Either way, this image is irresistable and available at The Squigglefly Shop.  So dress up those corners and if you use a Squigglefly image, you'll be in the running to win a fabulous prize.
 
Take care, be good and if you can't be good, be good at it!
Hugs n' Happy Stamping...
Lisa xx


Sunday, September 23, 2012

The 7 Dwarfkin's Homemade Wreath

Welcome again to another spectacular linky party at Make It Monday.  I am so excited to share this little wreath I made with you.  These absolutely hysterical images are from our sponsor Digi Doodle Shop called The 7 Dwarfkins.  Rather than bore you with lengthy typing, I made a little picture tutorial for you.  So here you go...


And that's all there is to it!  One extra tip. If you plan to have your images outside, I would add a layer or two of embossing powder over them just to protect them from the elements. 
Whelp, that's all for me on this post, but we would love for you to come on by and share your talent and creativity with us at Make It Monday and be in the running for the prize from Digi Doodle Shop of a $10 gift certificate from their store! 
 
Now for the best part, my.....
Nancy has created this adorable mini pizza box and it just rings of Autumn with the wonderful fall colors and that precious Meljen image.  Be sure to check out her blog as she's included a link on how to make this yourselves! Thank you for sharing this with us Nancy, it's wonderful!
 
Thank you, thank you, thank you for your visit and I hope you've been inspired by this project.
Hugs n' Happy Stamping & Crafting,
Lisa xx