Sunday, October 30, 2011

Copic Tranquility

Thanks So Much
Welcome back to another challenge at
Make It Monday

With the incredible sponsor
Who is offering the winner 5 digis of their choice!

Before I go onto my card, I'd like to show you my 
PICK OF THE WEEK
from last weeks most amazing entries!

Having A Bad Day?
From Ruby at Ruby 2 Shoes Design
Isn't this AWESOME!!
Thanks for the giggles, Ruby!

I had a wonderful time coloring this image from Di's Digi Downloads called Bridge Background.
This was colored with Copics
Love the new mini clothespins from Stampin' Up!

The card was designed by combining two challenges.  One for a sketch at Papertake Weekly and the other for Flourishes using Trees and Leaves. 


Thank you so much for stopping by.  Sorry for the short post, but I just got back into town and I'm behind in the laundry and costumes to finish making and pumpkins to carve and dinner to make; which is why Ruby's card is perfect, because in about 3, 2, 1....I'll be on the floor in the same pose!

I apologize that I haven't responded to everyone's comments yet, but since I'm back home now, I promise to visit your blogs and enjoy my morning coffee with your beautiful creations.

Have a great one...
Lisa xx


Saturday, October 29, 2011

And They're Off...

Headed To The Melbourne Cup
It's time for the horse races in Australia where there are going to be an abundance of
 flowers and hats and more flowers and hats and did I mention...
flowers and hats?
Which leads me to the latest challenge at
The Squirrel & The Fox
Ready for it?
Hats or Flowers or Both!
And our wonderful sponsor is
Prize is a AU$15 voucher to spend in the online store. 

Close-up of Summer Dreams
from Make 'It'' Crafty
As well as the Cobblestone Path.

I decided to make this card "Less Is More" because these amazing images 
are really able to tell the story without me adding anything else.

Copic Colors Used
Hat & Dress - B32, 34, 41
Hair - E13, 34 and Y23
Skin - E003, E30 and R20
Shoes - C0,06
Flowers & Ribbon - Y02, 08, 13


Thanks so much for stopping in and I hope today finds you happy, healthy and creative!
I would also like to say a very warm welcome to the newest talented blog buddy followers.  Thank you so much for allowing me to be so inspired by you as well!!
Lisa xx
Be sure to check out 
The Squirrel & The Fox


Tuesday, October 25, 2011

Party 'Til The Cows Come Home?

What Happens On The Farm,
Stays On The Farm
Welcome back to another challenge at
This week we are keeping in theme with the holiday of Halloween
and our challenge is...
TRICK OR TREAT
And our ever gracious sponsors
Offering
1 prize of 5 digi stamps of your choice
and 
Who is offering our featured tipper an amazing book!

Spooky Critters
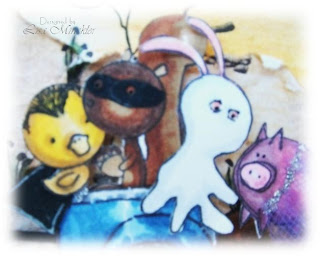
These animals are a compilation of Stampin' Up! stamps that I altered for 
Trick or Treating.
The (Boo Moo) cow and (Purple Tutu) pig are from Very Punny
and the (Dracula) duck, (Zoro) squirrel and (Ghost) rabbit are from Animal Crackers.

Driving the Herd
This little witch is also from Stampin' Up's set, Tag Time.

The clouds and bats are hand drawn and the tree stamp is from Rosie's Roadshow

Trick Or Treating In a Truck
The road is actually a window ledge from the stamp set, Beautiful Day, by There She Goes.
The hills are just torn white card stock that I've layered on to card base.
The truck and pumpkins are from Stampin' Up! Loads of Love and Loads of Love Accessories
Rocks and grass sprigs are also from Rosie's Roadshow.

I've colored everything with Copic markers, 
but was having so much fun, I forgot to write them all down.

I hope you've enjoyed your visit and are inspired to join us at
for our 
Trick or Treat Challenge!!
Thanks so much for stopping in and
Happy Stamping...
Lisa xx

Challenges I would like to enter:
Divas by Design - #13; Something Spooky (Animal Trick or Treaters. Pig in a Tutu is kinda scary!)
Whimsical Wednesdays - Halloween (I hope this card counts as a home decor)
The Paper Shelter - #36 Harvest (Fall colors and delivering pumpkins in a truck)
Crafting For All Seasons - #12; Halloween Challenge


Sunday, October 23, 2011

Blue Christmas Without You...

Unconventional Christmas Card Colors
Here is my DT card for another challenge at
Make It Monday
Where the DT's have feverishly been working, like elves in Santa's workshop, to create amazing projects for your inspiration!
And our gracious sponsor this week is none other than...
With a prize of a £10 voucher 
We can't wait to see what wonderful paper creations you make that we can drool over!

Close Up of Crocheted Flower
Was a little melancholy today when I was making this card since the kids and I won't be able to
spend the holidays with their dad this year.  Decided that I would make blue the primary color for this card.  

(Brief Intermission For a Little Love Note)
"Since I know you, my husband, read this blog from overseas, I just wanted you to know that even though we can't be together for the holidays, you are ALWAYS with us in our hearts and on Skype, thank God for Skype. We are SO proud of you and realize that you are making the bigger sacrifice.  We LOVE  you so much and can't wait for you to come home. 
Next Christmas I won't ask Santa for anything ('cept maybe a new stamp set, but only one and possibly a gift card to Hobby Lobby, but that's it, or a few new Tim Holtz products, but other than that, nothin' else,) because I'll already have the best gift ever...
YOU!"
and that's the truth!
(End of Brief Intermission)

Back to my card...
The DP is unusual, but it's a lovely design with acorns from Stampin' Up!
The snowflake is red felt that I've covered in Versamark and heat embossed with silver powder.
Crocheted the flowers out of baking twine and added an antique button sprinkled with a dusting of
Duo Blue-Green Pearl X.  
Adhered them all together with a hot glue gun.
Tags were edged with Mellow Moss and the sentiment is from the new Stampin' Up! Petite Pairs stamp set.
Additional felt snowflake added with gold stickles.
The basic rhinestones are colored with Copics B34
The white and gold winter wonderland ribbon is from Celebrating With Ribbons.
Golden Mesh is also behind the Snowflake and fans out for a bit more flare.

Variety of blues seen here
That's it for this card.

Now onto...
PICK OF THE WEEK
(and may I just say...CRIPES...this never gets any easier!)

This totally UNIQUE card really caught my eye.
Love the creative shape, the message and the waaaay out of the box thinking!
Nicely done Hannelie at
Desert Diva


Phew...all done now.
Happy stamping...
Lisa xx

Saturday, October 22, 2011

Dream Home On A Rope...

Log Cabin Milk Carton #7
I created the carton this morning based on my inspiration from Linda's 
EVER WONDERFUL and INSPIRATIONAL 
12 Tags Of Christmas Challenge.
Here is Linda's tag #7
at 
As soon as I saw this tag, I felt like I was looking out a window into the snow covered woods.
Then I thought, if I was looking out a window, what would the house look like?
Well, it would look like my dream home...a log cabin!
Here's how I assembled this challenge.

Make the milk carton frame
Punch a 1.5"x 1.5" square out of cardstock
Place cardstock onto the carton where you want the windows and using an X-ACTO Knife,
cut out each window.

Using the same cardstock as the house, cut thin strips of paper to make the widow separations 
and adhere them to the backside of the carton.


The days before a Big Shot

I did replace my BigShot recently, but I had to use something unused or not used in a very long time for ABC Christmas Challenge ,so...
I took my Fiskar wood grain texture plate and the little Fiskar impessions tool, which I haven't used in eons, and hand embossed the outside of the carton.
Using Close to Cocoa, Chocolate Chip (Stampin' Up!) and White Pigment Ink (CTMH),
stained the exterior of the house.

I took a strip of acetate and cut 2" x "2 squares and placed them over the window slats to make "glass."

Next I applied 3D foam above and below the window.

Once I had googled, "Log Cabin Christmas" I set the images to measure 2" x 2"
and then laid them onto the sticky foam.

Here is the result

Assembled Log Cabin Home
Each window peeks into a Christmas living room

Window A

Window B

 Window C

 Window D
The windows looked adorable, but they needed a pop of color so I made 8 red Dutch Shutters and scored each one for definition and drew on the hinges, handles and accessories and then "weather proofed" them with Close to Cocoa stain as well.
Because Linda's tag has snowflakes and pine cones,
I recreated my impression of snow with Acrylic Dimensional Writer and  the trees draping around the window with faux moss; also accented with "snow."

Well, that's my lengthy but hopefully inspirational holiday post.
Hope you've enjoyed it.
Thank you SO much for stopping in to visit and
Happy Stamping to you...
Lisa xx

Challenges I would like to enter:
The Funkie Junkie - 12 Tags Of Christmas #7
ABC Christmas - U is for Unused Stash (Fiskar Woodgrain texture kit)
Jingle Belles - Christmas; Soft & Cozy (Gentle snow and warm fire and tree lights)


Tuesday, October 18, 2011

Silhouetted Pumpkin Avenue

Pop Up Pumpkin Patch
I created this for Top Tip Tuesday's challenge
LAYER IT UP
&
Bettina's Pop Up Card Tutorial
Sponsored by
1 stamp of your choice & a goodie bag!
&
$10 Store Voucher

Stitchy Bear's very own Pumpkin Avenue
Side view of pop up card
Supplies Used:
Polka dot ribbon was recycled from an old gift bag
Plaid bow is a strip of scrap material gathered in the center and an orange gem added for accent
Silhouette cat, raven on a branch and b&w pumpkins from PC clipart
Fence Post punch from Fiskar
I added 7 orange gems to balance the color of the image and then glued moss down around the pumpkins for more layering.
Image was colored with Derwent Watercolor Pencils

Thanks for stopping by :D
Lisa xx


Sunday, October 16, 2011

Triple Window Wonderland...

Vintage Christmas
Welcome back to another
Make It Monday Challenge
Our sponsor for this weeks challenge is
Who is offering the winner a ...
£10 Gift Voucher!! 

My DT card for Make It Monday
This image is from SU! Greeting Card Kids
I center creased each layer as well as the image, applied a tiny bit of adhesive and then sewed her onto the last layer.
The white flowers were altered with Derwent Watercolor Pencils and the pearls were colored with Copic marker R27.
Here is the link if you'd like to see where I got my inspiration and directions.
The directions are wonderful but I altered them a bit by measuring the space needed for the main image and then making each additional window opening approximately 1/4" wider as I progressed to the top layer.

This is always the most fun, but the hardest thing to do...
Kudos to ALL the amazing crafters who submitted entries last week...
You are ALWAYS an inspiration to me.
But alas, I must only pick one, so here it is.
PICK OF THE WEEK
I loved the stenciled tree and the pop of color only on the Geisha and the CAS frame of the card, yet elegant all at the same time.  
Nicely done, Jan!

Thank you so much for stopping in for a visit.
I love your comments and encouragement and always the laughs!
Happy stamping...
Lisa xx

Challenges I would like to enter:
Crazy 4 Challenges - C4C109; Upcoming Holiday
Polka Doodles -  #41; Ribbons and Bows